Create an Online Course for Free (Using ADDIE with Gnowbe)
Check out how Gnowbe allows trainers & content creators to create an online course for free using ADDIE instructional design model. Click to learn more now!
This is a quick guide that goes over the basics of how to create an online course for free using Gnowbe.
Gnowbe is a free editing platform that allows trainers and content creators to create bite-sized, engaging programs that can be shared with (or sold to!) learners. Gnowbe is a versatile tool that you can do a lot with, so I’ll just be giving a brief overview of the process - I highly encourage you to create your own account and play around with the features to learn more.
To guide us in this process, we will reference the ADDIE instructional design model:
- Analyze: Identify problems, set learning goals, and identify learners’ needs
- Design: Transform learning goals into clear learning objectives, storyboard the entire course, plan the lessons, and select appropriate media formats
- Develop: Create and develop the learning journey and materials that you’ve designed in the previous step
- Implement: Distribute your course to your learners
- Evaluate: Evaluate if your course is effective and make necessary improvements
Let’s take a look at the five steps required and the free tools that you can leverage to create and launch an online course for free!
Step 1: Analyze
The goal of this step is to gain an understanding of your instructional goals and objectives. Please don’t skip this step - having an overarching objective that we can refer to while designing a course is extremely important as it keeps us focused during the design process.
In this phase, make sure you are clear on the following (at minimum):
- Learning goals: What problems are your learners having and how does it relate to what you’re trying to solve? What is the overall objective of your course?
- **Target audience:**Who are you designing for? What are their demographics (age, gender, nationality, level of education, etc.)? How comfortable are they with technology? What is their skill level; do they have any existing knowledge of this topic?
- Learning style/environment: What kind of online course are you creating? Is it fully self-paced or blended? What level of interaction are you planning for?
When you create a course on Gnowbe, this information can be represented on the program Cover Page, which can be thought of as the cover of a book. In the program description field, I like to have at least three points of information:
- **What this program is about:**Briefly tease the course. Make it appealing!
- **Who this program is designed for:**Describe your target audience here.
- **What learners will take away at the end of this program:**What’s in it for the learners? State your learning objectives so learners know what to expect.
Let’s jump straight into creating a Gnowbe Program and editing your program Cover Page!
Navigate to Gnowbe Web and create a free account if you don’t already have one. Click on the “+ Create a Program” button at the top right, then “Create Your Own”.
 Creating a program on Gnowbe - it’s free!
Once you give your program a title, you can start typing in the text fields to fill out your Cover Page.
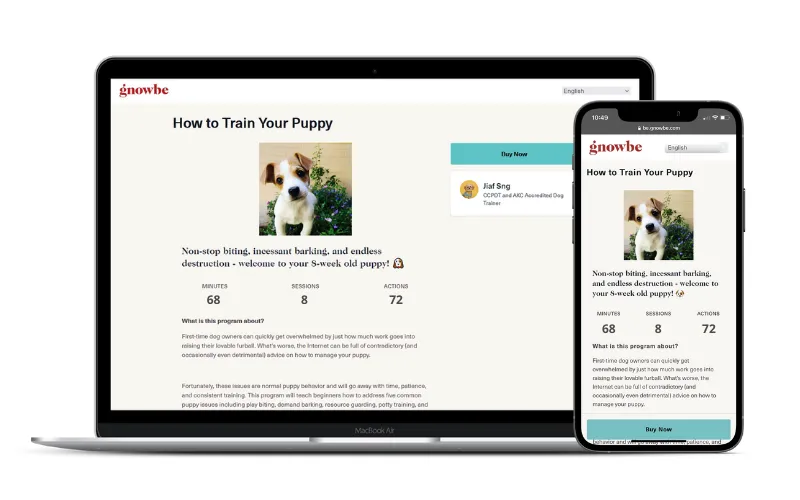
For this guide, I’ll create a demo course on “How to Train Your Puppy.”
 Here’s an example program Cover Page for a course I’m creating on how to train your puppy - no code needed!
Step 2: Design
Now that you know the direction of your course, you can visualize the goals into clear learning objectives by storyboarding your lessons and selecting appropriate media formats (e.g., videos, activities, articles, etc.)
There are a few ways you can do this. For this guide, I will go through the following:
- Storyboarding your course with a spreadsheet/whiteboard
- Storyboarding your course with an organization tool like Trello
- Storyboarding your course directly on Gnowbeby creating ‘ghost’ or dummy actions
Option 1: Storyboarding your course with a spreadsheet/whiteboard
You can use good old-fashioned pen and paper to plan the structure of your course. I very much prefer typing over writing, though, so I like to use a spreadsheet to organize, but the concepts are the same.
Here is an example of how I use spreadsheets to storyboard my course:
 Using a spreadsheet to storyboard my course and plan the learning objectives.
Basically, I state the learning objectives for each session (or lesson), outline how I want to teach the content, look for relevant media (videos, articles, etc.) to support the learning experience, and pepper in activities where appropriate.
Option 2: Storyboard your course with an organization tool like Trello
If you’re one of the many people who dislike spreadsheets, you can also create a storyboard with a project/task management tool like Trello. In Trello, you can create ‘cards’ to represent each action in your program.
 Using Trello to storyboard my course - easily add cards that represent content and move them around.
The benefit to using a Kanban-board-style platform like Trello is that you can easily rearrange your cards to move activities about!
Option 3: Storyboarding your course directly on Gnowbe by creating ‘ghost’ or dummy actions
If you prefer to work with as few tools as possible, you can begin storyboarding directly on Gnowbe by creating ghost or dummy actions. These are essentially shell actions with minimal or no content, used only to help you plan the layout of each session or lesson.
 Using Gnowbe to storyboard my course with shell actions.
We will go into greater detail on how exactly to create different actions in the next step when we discuss how to develop your course.
Step 3: Develop
Now that you have your plan, it’s time to actually develop your course. If you’re an independent trainer, it’s likely that you’d prefer to create the course yourself instead of hiring a team to build it for you. Fortunately, using Gnowbe, you can create a complete eLearning or microlearning course in just a few hours.
Let’s quickly go through how a Gnowbe course or program is structured:
- **Program:**This is what the platform refers to as a course. In my example, my program is “How to Train Your Puppy”
- Session: Each program is split into several sessions - this is similar to the chapters of a book, the lessons within a curriculum plan, etc. In my example, I’ve structured my program into 8 sessions, like “Introduction”, “Play Biting”, “Separation Anxiety”, etc.
- **Action:**Each session is comprised of actions - these are short blocks of content in the form of text, interactive quizzes, videos, articles, etc. In my example, within the “Play Biting” session, I have several actions requiring learners to read an article, watch a video, perform an activity, etc.
Let’s learn how to add sessions and actions on Gnowbe. (If you haven’t created a program yet, see Step 1 above on how to create a program and edit your Program Cover page.)
From the Program Cover page, click on “Manage sessions” on the top left. From here, you can add new sessions, copy or delete existing sessions, and reorder sessions.
 When in Edit mode, easily add, delete, copy/paste, and reorder sessions.
Since you already have your storyboard from the Design phase, it should take just a few minutes to add the respective sessions into your program.
Congrats, you’ve just finished building the skeleton of your course! Wasn’t that easy? 😊
Now, let’s populate these sessions with actions. When you’re in Edit mode, there’s a button to “Add a new action” at the bottom of each session. Clicking on it brings up the**“Select an Action Type”** window, which allows you to pick from (at present) 14 different choices.

Here are some of the most popular action types that you can start building your session with:
- **Text:**The most basic action, where you can type a few paragraphs of text and include a relevant image.
- **Video:**Upload a video for learners to watch. (Tip: If you’re linking a YouTube video, use the Web Link action instead. Be sure to have permission to share the video and/or include appropriate attribution!)
- **Word Puzzle:**A highly gamified action where learners complete to answer a question, hangman-style, in the shortest amount of time.
- **Question & Answer:**Ask a question and have learners type their answers. Learner responses can be shared with the group and are viewable by course administrators on Gnowbe Dashboard (backend).
- **Image & Audio:**Upload a single image or audio file with some accompanying text. (Tip: Many creators like to upload a single slide with a voiceover to explain its content.)
- **Multiple Choice:**Create a poll or multiple-choice quiz for learners to engage with.
Selecting an action to add to your session will bring up its equivalent editing page, allowing you to easily type in the text fields to create your action. For example, in this example Question & Answer action, I can add text, upload my own photo (or select a stock image), add multiple-choice options, and toggle whether said options are correct or wrong.
 Creating a multiple-choice question (or poll) in seconds!
Here is what this action will look like for learners. (Tip: You can swap between edit mode and learner view by clicking on “Edit” and “Save and View” on the top right respectively.)
 The finished product - what a multiple-choice action on Gnowbe looks like for learners.
If you’re looking for an in-depth guide on how to use each action, I encourage you to check out Gnowbe’s Basic Curator Training program - it’s a free guide that goes into detail about each action and what they’re best used for.
If you’re having trouble creating a program on Gnowbe, check this help article for a step-by-step guide.
Step 4: Implement
After your course is complete, it’s time to implement it - in the case of an eLearning module, it’s time to distribute your program to the learners.
If you’re not looking to profit, you can share your course with learners for free. However, if you’re looking to sell your courses, you can do so with GnowbeShop.
GnowbeShop is a built-in commerce system that lets you sell your courses through your own online channels. GnowbeShop allows you to set your own price and even create promo codes. It includes a global payment engine that automatically manages international tax and VAT!
GnowbeShop requires some initial set up that can be easily done by following this step-by-step guide on How to Set Up GnowbeShop. Once you’re done, you’ll be able to set a price and create promo codes (if desired) for your course(s).
Here’s what it looks like during set up - in my example case, I’ve put my program, “How to Train Your Puppy” on sale for US$20. I’ve also created a promo code, PUPPY10, that gives the first five users 10% off the sale price, valid until March 2023.
 Distribute your courses with GnowbeShop - set prices, create promo codes, and start selling!
I can then share the GnowbeShop program link (URL) with potential buyers, or put it on my website, and start marketing my course. Note that if you’re using the free plan, GnowbeShop takes 20% of the sale price.
 Selling my course with GnowbeShop.
Step 5: Evaluate
After you’ve gotten some sales, remember to set some time to evaluate if your course is effective, and make necessary improvements.
As always, there are a few ways you can do this. For this guide, I will go through the following:
- Going through learner feedback
- Checking sales data from GnowbeShop
Option 1: Going through learner feedback
When you’re creating your course, I recommend that you include a few opportunities for learners to give feedback. This can be done in the form of surveys or open-ended questions. Here are some examples of three different ways in which I gather feedback from my learners:
 Three different types of actions on Gnowbe to collect learner feedback.
Gnowbe Dashboard collects and collates this data for easy analysis. The information can also be exported to a spreadsheet if you wish to further filter, sort, and analyze the data. Looking through learners’ responses on what could have been improved indicates where you can better your course, and seeing what they thought was done well lets you know what successes to replicate in future courses.
 Using Gnowbe Dashboard to view program and learner analytics, providing insight on where learners struggled, what they liked, and what could be improved.
Editing a course on Gnowbe is as simple as going back to Edit mode and making the changes directly to the program. The changes you make will be automatically synced across mobile and web to all your learners in real time - there’s no need to take down your course, change things, and reupload it again.
Option 2: Checking sales data from GnowbeShop
While Gnowbe Dashboard gives you information on what learners thought about the content of your course, the GnowbeShop Sales page gives you data on what price points and promotions worked well. By tracking your sales history, you can understand patterns and adjust your marketing plans accordingly.
With that information, you can edit the prices of your course, create new promo codes or retire unsuccessful ones, and launch new marketing campaigns!
 GnowbeShop shows you transaction and promo code history to better guide your marketing decisions.
Conclusion
Hooray, you now know how to create and launch an online course for free! From Analyze to Evaluate, utilize the ADDIE model of instructional design together with Gnowbe to create and launch an unlimited number of courses.
What’s next? While you can create unlimited programs and use GnowbeShop for free, you can also subscribe to a Starter plan to access powerful features such as adding co-curators for collaboration, sending emails and push notifications to learners, and more. Stay tuned for our next post on how to utilize the additional features unlocked with a Starter plan!
Ready to Transform Your Training?
Join leading organizations that trust Gnowbe to deliver measurable learning outcomes.